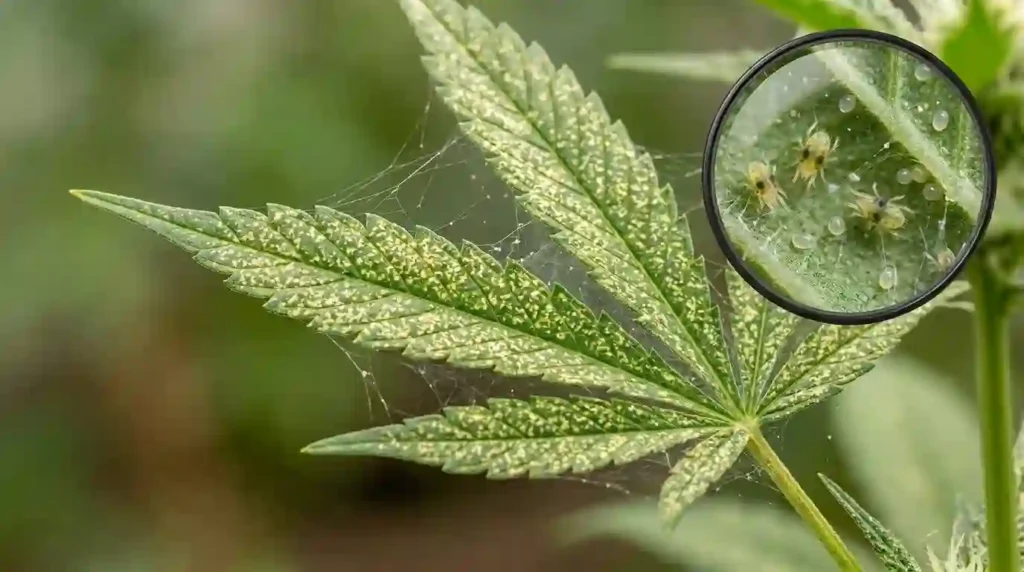
If you have ever walked into your grow space and noticed tiny white or yellow speckles dotting your plant leaves, you already know that sick feeling. Something is wrong. You lean in closer and spot the faint webbing clinging between the stems and the underside of the leaves. Spider mites. They are small, fast-moving, and if you ignore them for even a week, they can turn a healthy plant into a stressed, struggling mess.
Spider mites are one of the most common pest problems that cannabis growers face, whether they are working indoors under grow lights or outdoors in a garden. They are not picky. They will attack beginner setups and experienced grow rooms alike. The good news is that this pest problem is very manageable once you understand what you are dealing with and act quickly.
In this guide, you will learn exactly what spider mites are, how to identify them early, and the most effective ways to get rid of them using both natural and chemical approaches. You will also find practical pro tips drawn from real growing experience, common mistakes beginners make, and answers to the most frequently asked questions. By the end, you will feel confident handling this pest problem head-on.
What Are Spider Mites and Why Are They Such a Big Problem?
Spider mites are not actually insects. They belong to the arachnid family, which makes them relatives of spiders and ticks. The most common type that attacks cannabis plants is Tetranychus urticae, better known as the two-spotted spider mite. They are incredibly small, usually around 0.5 millimeters, which means the naked eye can miss them until the infestation has already grown.
Here is what makes them especially dangerous for cannabis growers: spider mites reproduce at an alarming rate. In warm, dry conditions, a single female can lay dozens of eggs per day. Those eggs hatch in as little as three days. Within two weeks, you can go from a small, almost invisible problem to a full-blown colony covering multiple plants.
They damage plants by puncturing individual plant cells and feeding on the contents. This cuts off the plant’s ability to photosynthesize properly, which slows growth, weakens the plant, and in serious cases, can kill it entirely. Think of it like poking thousands of tiny holes in a leaf with a pin. Each individual hole is minor, but when there are millions of them across your whole plant, the damage adds up fast.
How to Identify Spider Mites Early
Early detection is everything with this pest problem. The sooner you catch it, the easier it is to fix. Here are the signs to look for:
- Stippling on leaves: Tiny white or yellow dots scattered across the top surface of leaves. This is where the mites have been feeding from below.
- Webbing: Fine, silky webbing on the underside of leaves, between stems, or near bud sites. This is a clear sign the infestation has reached a more advanced stage.
- Leaf discoloration: Leaves may start turning yellow or bronze, especially at the tips and edges.
- Slow growth and drooping: A heavily infested plant will look stressed, wilted, or simply stop growing at its normal pace.
- Visible mites: If you flip a leaf and look closely, or use a small magnifying glass (30x jewelers loupe works great), you may actually see the mites moving. They look like tiny, pale dots with legs.
Make it a habit to inspect the underside of your leaves at least twice a week. Most growers miss infestations because they only look at the tops of leaves. Spider mites live and feed on the underside, so that is where you need to look.
Step-by-Step Guide to Getting Rid of Spider Mites on Cannabis Plants
Once you confirm a spider mite infestation, move quickly. Every day you wait, the pest problem grows. Here is a practical plan of action that works at any stage of the grow.
Step 1: Isolate Affected Plants Immediately
If you are growing multiple plants, the first thing to do is separate any plant that shows signs of spider mites from the healthy ones. Spider mites spread fast, especially indoors where plants are close together. Isolating the problem plant buys you time and protects the rest of your garden.
Step 2: Reduce the Temperature and Increase Humidity
Spider mites love hot, dry environments. They thrive when temperatures are above 27 degrees Celsius (80 degrees Fahrenheit) and humidity is below 40 percent. Dropping your grow room temperature to around 21-24 degrees Celsius and raising humidity to 50-60 percent will slow their reproduction significantly. This alone will not fix the spider mite problem, but it makes the environment less hospitable while you treat the plants.
Step 3: Remove Heavily Damaged Leaves
Any leaves that are badly stippled, yellowing heavily, or covered in webbing should be removed and discarded immediately. Do not compost them. Place them in a sealed bag and throw them in the trash outside your grow space. This removes a large portion of the existing mite population and their egg clusters.
Step 4: Apply a Treatment Solution
This is the heart of the spider mites fix. There are several effective options depending on your preference for organic versus conventional methods.
Organic and Natural Options:
- Neem Oil Spray: Neem oil is derived from the neem tree and is one of the most widely used natural treatments for spider mites. Mix one tablespoon of pure neem oil with one teaspoon of mild dish soap and one liter of warm water. Shake well and spray thoroughly on all leaf surfaces, paying close attention to the undersides. Repeat every 3 to 4 days for at least two weeks.
- Insecticidal Soap: A diluted soap spray breaks down the mite’s outer protective layer, effectively killing them on contact. Use a product specifically labeled as insecticidal soap, or make your own with a small amount of pure castile soap and water. Avoid using it in strong light or heat as it can cause leaf burn.
- Predatory Mites: If you are dealing with a persistent or heavy infestation, introducing beneficial predatory mites such as Phytoseiulus persimilis or Neoseiulus californicus can be extremely effective. These predatory insects feed exclusively on spider mites without harming the plant. This is a biological control method that is especially popular in organic and large-scale grow operations.
- Rosemary Oil or Peppermint Oil Spray: Some growers have had success with diluted essential oil sprays, which disrupt the mites’ nervous system. Use sparingly and always test on one small area of the plant first to check for sensitivity.
Chemical Options (Use with Caution):
- Miticides: Products specifically designed to kill mites are called miticides or acaricides. These are effective but should be used carefully and only when organic methods are not working. Avoid using any chemical treatment during flowering if possible, and always follow label instructions.
- Spinosad: A naturally derived pesticide that is effective against many pests including spider mites. It is considered safer than many synthetic options and can be used with less risk during vegetative stages.
Step 5: Repeat Treatments Consistently
This is the step most beginners skip, and it is where the spider mites fix falls apart. Mite eggs are resistant to many treatments. A single application will kill the adults but leave the eggs behind. Those eggs will hatch within a few days, and you will be right back where you started. You need to apply treatments every 3 to 4 days, for a minimum of two to three weeks, to break the reproductive cycle completely.
Step 6: Clean Your Grow Space
After treating your plants, wipe down the walls, floors, pots, and any equipment in your grow room with a diluted bleach solution or hydrogen peroxide. Spider mites and their eggs can survive on surfaces and re-infest your plants later. Cleaning the environment is just as important as treating the plant itself.
Pro Tips From Real Growing Experience
These are the kinds of things you only learn after dealing with spider mites a few times. Hopefully you can skip the hard lessons by reading them here.
- Rotate your treatments. Mites can develop resistance to a single treatment over time. Alternate between neem oil, insecticidal soap, and another method to prevent resistance from building up.
- Spray at lights-off. Never apply sprays when grow lights are on or during peak heat. The heat combined with oil or soap sprays can cause leaf burn. Always spray just before the dark cycle or in the early morning for outdoor plants.
- A clean grow room is prevention. Many spider mite infestations start because of poor hygiene in the grow space. Dead leaves on the floor, dirty pots, or bringing in new plants without quarantining them are all common entry points.
- Quarantine new plants. If you bring a new plant, clone, or cutting into your space, always isolate it for at least one to two weeks before introducing it to your main garden. This single habit prevents the majority of pest introductions.
- Do not treat flowering plants with heavy oils or soaps near harvest. Residues can stick to buds and affect the final quality. Stick to lighter treatments or water spraying during late flower, and avoid applying anything within two to three weeks of harvest.
Common Beginner Mistakes When Dealing with Spider Mites
- Treating only once and assuming the problem is solved. As mentioned, this is the number one mistake. Always complete a full treatment cycle.
- Not treating all plants in the room. Even if only one plant shows visible symptoms, mites have likely already spread. Treat every plant in the space as a precaution.
- Ignoring environmental conditions. Using treatments without adjusting temperature and humidity is like bailing water from a boat without plugging the hole.
- Using too strong a concentration. More is not always better. Overly concentrated sprays can cause more damage to the plant than the mites themselves.
- Not reading the product label. Every treatment, even natural ones, has specific dilution rates and application instructions. Skipping this step often leads to ineffective treatment or plant damage.
Important Considerations for Growers
Environmental balance is the foundation of a healthy grow. Spider mites are an opportunistic pest, meaning they thrive when a plant is already stressed. Overwatered roots, nutrient deficiencies, and poor airflow all weaken a plant’s natural defenses. Keeping your growing environment stable and your plants healthy is the best long-term defense against any pest problem.
Airflow also plays a key role. Good air circulation makes it harder for spider mites to settle and establish colonies. A basic oscillating fan directing gentle airflow across your canopy can make a meaningful difference over time.
On the legal side, always be aware of the regulations in your region regarding cannabis cultivation. Laws vary significantly from one country, state, and municipality to another. This article is provided purely for educational purposes about plant pest management. It is your responsibility to understand and comply with all applicable local laws before growing any plant.
Quick Summary: Spider Mites Fix at a Glance
- Check the underside of leaves regularly for stippling, webbing, or visible mites
- Isolate affected plants as soon as you spot the pest problem
- Reduce temperature, increase humidity to slow mite reproduction
- Remove heavily damaged leaves and dispose of them outside your grow space
- Apply neem oil, insecticidal soap, or predatory mites as your treatment of choice
- Repeat treatments every 3 to 4 days for 2 to 3 weeks
- Clean your entire grow room, not just the plants
- Quarantine all new plants before introducing them to your main grow space
Frequently Asked Questions (FAQs)
Can spider mites kill a cannabis plant?
Yes, in severe and untreated cases, spider mites can kill a cannabis plant. They damage the plant’s ability to photosynthesize by destroying individual leaf cells. A heavy infestation over a prolonged period will cause the plant to become too weak to sustain itself. However, if you catch and treat the pest problem early, most plants recover fully.
How long does it take to get rid of spider mites?
Realistically, expect to spend two to four weeks on a full spider mites fix. The treatment itself is straightforward, but breaking the mite’s reproductive cycle takes time and consistency. Multiple applications are always required since most treatments do not kill eggs on contact.
Is neem oil safe to use on cannabis plants?
Neem oil is generally considered safe for use during the vegetative stage. It is an organic, plant-derived product and is widely used in horticulture. However, most experienced growers avoid applying neem oil during the flowering stage, particularly in the later weeks, as it can leave residues on developing buds. Always follow dilution recommendations carefully.
Where do spider mites come from?
Spider mites can enter your grow space in several ways. They are commonly brought in on clothing, tools, or from other infested plants. Outdoor grows are naturally more exposed. Indoors, poor ventilation filters or open windows can allow mites to drift in. New clones or cuttings from other growers are another frequent entry point, which is why quarantining new plants is so important.
Can I use hydrogen peroxide to treat spider mites?
A diluted hydrogen peroxide solution (typically 3% concentration diluted further with water) can be used as a supplementary treatment and is useful for cleaning your grow room surfaces. It has some effectiveness against mites and their eggs on contact. However, it breaks down quickly and should be used as part of a broader treatment plan rather than as the sole spider mites fix.
Final Thoughts
Spider mites are frustrating, but they are a manageable pest problem. The growers who struggle most with them are usually the ones who wait too long to act or who treat inconsistently. The biology of spider mites makes them tough to eliminate in a single round, but it also means that a disciplined, repeated approach will win almost every time.
The most important takeaways are simple: inspect your plants regularly, act fast when you see early warning signs, treat thoroughly and consistently, and keep your environment balanced. Clean growing conditions, good airflow, and healthy plants are your best preventive tools against any pest problem, including spider mites.
Understanding the life cycle and behavior of spider mites is what separates growers who constantly battle pest problems from those who solve them once and move on. You now have that understanding. Use it, stay consistent, and your plants will thank you for it.
Disclaimer: This article is intended for educational and informational purposes only. Cannabis cultivation laws vary significantly by country, state, and region. Always check and comply with the laws applicable in your area before growing any plant. This content does not promote or encourage any illegal activity.
Educational Note: All information in this article is provided for general educational and informational purposes related to plant science and horticulture. Cannabis growing regulations differ by jurisdiction. Always consult your local laws and regulations before growing any plant.